Showing posts with label yamaha. Show all posts

13 December 2020

Deckard's Dream DIY (Part 1)

 If you follow my blog you know I like to build my own synthesizers. Unfortunately due to my divorce I had to sell a lot. Also some of my DIY stuff. But as you know after 2,5 years I have a small studio again. Luckily I still had a DIY kit that I saved. It is a Deckard's Dream which is actually a clone of the famous Yamaha CS80 that was heavily used my Vangelis one of my favorite musicians. I did have a CS60 in the past and that came close. So I'm really looking forward to this synthesizer. But the build is a lot of work and not the easiest to build. First thing up is build  the 8 voice boards. In the picture you see the back of the first one. You have to solder a lot of very  small SMD capacitor on there to begin with. I never really did that and my eyes used to be better ;) So that was quite a challenge.

After that you start with the resistors and diodes. There are a lot actually and you need to pay attention to the correct value going in the right spot. Usually it is quite a puzzle, but luckily some made a build document that made life a lot easier. It is divided with a drawing that highlights all the resistors of one value and where they need to go. That actually saves a lot of time and mistakes. And one thing I learned myself is using to multi meter to measure the resistor values before I put them in and not rely on what is printed on the bag you buy since sometimes the supplier makes mistakes too. It is a lot of work, but actually I find this work very therapeutic and relaxing :) So I don't mind.

After This the capacitors go on. Just like the diodes here you have to watch the orientation too. Getting this far for the first board was about a days work. So time to stop and also the sun light was going away. Unfortunately I don't have very good lighting in my temporary work place which is actually the dinner table in our living room. So time to call it quits. 

And already I'm worrying if I didn't make any mistakes. But I decided to build the 8 voice boards one by one so when they are finished I can compare them to each other. It would be weird if I made the same mistake 8 times over. But well you never know ;) I will update you with part 2 soon.


25 June 2012

Replacing Yamaha AN1X Battery

This weekend is the Swingungen Party in Hamm Germany where some artists play that I know very well. I'm going there as a visitor to see them play, but two of them asked me to bring some equipment since they can't bring much because of their limited space in transportation. One of the synths is the Yamaha AN1X. Of course I wanted to test the synths before I bring them and when I switched on the Yamaha it gave the message 'Battery Low'.

So this morning I went to the local electronics store to get a new battery. And then I started to see how to open up the AN1X. It turns out you have to put it up side down and then remove ALL the screws on the bottom. There are a lot I can tell you. I didn't count them but more than 30 for sure. I think Yamaha was afraid it would fall apart during playing ;) Well once you have it open and lift the cover you can easily see the battery and replace it. It is nicely put in a battery holder and takes a second to replace.

After you have replace the battery it has lost all it's settings and you need to do a factory reset and then put your sounds back into it. So if you didn't make a backup now is when you are screwed ;) But luckily I had no sounds in there that I had an emotional connecting with. After this I tested the whole synth and played a little on it and I must say it is a very nice synthesizer. One of the better Virtual Analogs out there I think and it is small, light and build as a tank so you can bring it a long on tour easily I guess :) Maybe I'll see some of you at the Garden Party next weekend!

10 December 2011

Building SammichFM DIY Video

This year I build a Wilba SammichFM DIY synthesizer kit. It is based on the famous Yamaha OPL3 sound chip that was also used on the famous Sound Blaster Pro 2.0 and SoundBlaster 16 ASP sound cards. It is a 4 voice FM synthesizer that sounds a lot like the famous Yamaha DX series. During the construction of the synthesizer I filmed the whole process. This movie is an excerpt of the 4 hours total build time. I made the 3D animations myself in Cinema 4D. The music you hear in the background in a track called 'Thermosphere' from my 'AtmoSphere' album that I released in 2008. More information on the album on http://www.synth.nl/AtmoSphere.

15 November 2011

SammichFM (Part 6)

In the last post I was at the point that the MIOS booted OK and now it was time to take it to the next level and program the software for the SammichFM. To do this you hook it up with the Midi input and output to your PC and run an application called MIOS studio. It actually talks to the processor of midi. It didn't work to begin with and after a few minutes I found out that one jumper on the main PCB was in the wrong position. After changing this the software was uploading alright.

The uploading of the software doesn't even take that long, but after that the SammichFM reboots and at first boot it starts to format it's memory banks. Since there are quite some installed by default that process takes a little while. Then finally after that you have a working synthesizer. So the big question was if it would actually produce sounds as well. I still was not sure about the soldering of those SMD components.

So I hooked up a midi keyboard and it worked! :) Always a very satisfying feeling when you can actually play on a synthesizer that you just build with your own hands. There was just one odd thing, there was only one preset in there. After reading a bit in the documentation I found out quickly that this was normal behavior and that you had to put in the factory presets by uploading a sysex file to it over midi. So I did and had some fun with it. It is a nice polyphonic synthesizer and it sounds very .... FM like :) Reminded me right away of the Yamaha DX series that were very popular in the 80's. All in all a very musically usable machine I think :) OK. Enough for today. Next up is to finish up the enclosure. Coming soon!

14 November 2011

SammichFM (Part 5)

With the electronics all done it is time to assemble the case. It is made up of several pieces of plastic that are hold together by bolts and nuts. It is kind of a sandwich construction with a bottom panel and top panel and the side panels will be squeezed between those eventually. In the picture on the left you can see the bottom panel of the whole construction. I only think I will add some rubber things under the case since now the screws are sticking out.


Then on top of this the base PCB is mounted. And on top of that go the spacers that will support the front panel PCB. On the left of the base PCB you can see the connectors that will eventually connect the base PCB and the front panel PCB. It provides power to the front panel PCB, but also the IO of the display, knobs, leds and rotary encoder. So it is kind of a bus system. Very clever I think. No need for extra wiring at all.

And on the left is a picture of the whole sandwich. Again some spacer go on top of the PCB that will eventually support the front panel it itself. I think this is quite an ingenious construction actually that Wilba came up with. It allows for easy access of the PCB's and it keeps everything easy and tidy. I'm not too good with mechanical stuff and case building, but even I can do this :) The rest of the case construction will follow later.


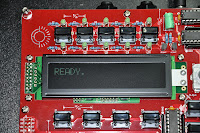
So when that done it was time to put the power on it and see if it actually was doing anything :) After switching it on you can see in the picture on the right that it worked. It shows 'Ready' in the display. Telling that the MIOS operating system is running on the PIC. It is kind of like the BIOS of a PC, but not the Operating System yet. Through this MIOS system you can upload software in the Midibox based synthesizer and that software determines its functionality. So that will be the next step in the next post. So far so good :) Still no smoke ;)

13 November 2011

SammichFM (Part 4)

The next step in the building of the SammichFM is to solder all the components on the front panel PCB's. In this picture you can see all the IC sockets, switches, transistors, resistors and capacitors already on the PCB. Actually this is a quite straight forward job. Only on the bottom two right switches you have to cut the leads very short, because otherwise they would touch the heat sink of the power regulator on the base PCB when the whole synth is assembled. Something not to forget.

Then you have to put some spacers on the PCB again. This time to put the front panel in place in order to solder the leds in place. By putting the front panel on, you can stick the leds through the holes simply by turning everything upside-down. Then the leds fall into their intended positions. Because the whole thing is upside-down the leds can't fall out anymore and you can solder them on the bottomside. A simple trick but very effective. Everything looks good.

After this the PCB's are done and it is time to do some power tests, just to see if there are no short circuit. Everything turned out OK, so I put in all the IC's. Basically the electronics part of the project is done now, so it was time for the famous 'smoke test'. I put power on the construction while holding the upper PCB up so that nothing touched each other. And they after applying power feel the IC's to check if they get hot. Well no temperature and no smoke. So all looks great.

And here is a final picture with both finished PCB's. So far I still filmed the whole process and I'm into 3 hours of film by now. Which means I build the whole thing effectively in three hours, but of course over a period of a couple of days. Usually I spend about an hour a day working on a project like this. The next thing will be to assemble the whole case and test the synthesizer. I'm very curious if it will work of course. I'll let you know soon!

11 November 2011

SammichFM (Part 3)

Next up was installing all the electrolytic capacitors. You have to pay attention here since their orientation matters. One leg is clearly longer than the other and the long leg is always the + (positive) side. In this picture you can see a little pile of them (green) between my tools. Maybe a nice moment to point out that is is the minimum of tools you would need for such a project: multimeter, cutting pliers, holding pliers, de-solder pump,some screw drivers and a soldering iron.

Here you can see the capacitors already on the PCB. As you can see most of them lay flat, so you need to bend the legs for those, and two are mounted standing up. On this picture also the connectors are already installed: Two midi connectors, two audio jacks, a power connector for the external 9V power supply and a Commodore 64 style power switch. On the front right is also a crystal install. I did solder that too quickly so it is not so neat on the PCB, but it'll work.

The next step is a tricky one. You have to install the big power regulator with two heat sinks. The whole construction has to be put on top of each other with heat pasta in between. That stuff is nasty and stick to everything, so you will have to practice the assembly first without the pasta and when you got the hang of it you do it one more time with the pasta on and try not to get it on your hands, cloths and the rest of the PCB. As you can see I did OK ;)

And then it is time to fit the LCD display on the front panel PCB. For this you have to put the spacers between the PCB's and put the connectors in place. Only like this you can solder them in the right height. The tricky thing though is that you can solder the connectors on the base PCB from the bottom, but you will have to solder the rest from the top, since you can't reach the bottom of that PCB this way. Once everything is soldered you can cut the leads and take the whole construction apart again.

10 November 2011

SammichFM (Part 2)

The next task in building the SammichFM was to install all the resistors. As you can see they are all 1% resistors and I always find it challenging to read the color codes on those. You easily mistake a 1K for a 10K resistor, so I tend to measure them all with a multimeter. Just to be sure. Luckily the resistor values are written on the PCB of the SammichFM, so it is easy. So measure a resistor and look for it on the PCB. You don't even need a part list for this process.

After the resistors it was time for the IC sockets Nothing difficult about that. The only trick I always use is to hold them with one hand with the PCB up-side-down and solder just one pin on the edge with the other hand. Then I look if it is in straight and if not I reheat just that one pin and readjust it. When you have already soldered multiple pins that is almost impossible. Then I solder the diagonal opposite pin (furthest away) and check again. After this you can solder the rest, since the socket can't move anymore.

Then it was time for the capacitors. And also a ferrite bead, a crystal and two diodes. Especially for the latest two you need to pay attention because their orientation matters. So far all the components are very flat and in this way you can easily roll the PCB over and solder on the bottom side. This, of course, is also the reason why you should solder in your components in this order. If you start with the highest components you lose this advantage.

And here a final picture of the OPL3 chip more up close, just because I thought it was a nice picture :) You can also clearly read the text on it. The PCB is full with little 'Easter Egg' jokes by the way. Wilba must have been in a very funny mood when he designed it, but I enjoy them while working. Not everything in life has to be so serious. I'm also still filming it all and it looks like I'll have enough nice material later on. In the mean time I've put my camera on permanent power, so that an empty battery won't spoil the fun again. Next post coming soon!

09 November 2011

SammichFM (Part 1)

Today I started a new DIY project as well. I'm going to build a SammichFM synthesizer. Like the name suggests it is a sister of the SammichSID, but this time not based on the Commodore SID chip  but on the Yamaha OPL3 chip (also know as YMF262). This was also a famous sound chip from the 8 bit computer era. It is a 4 voice stereo FM synthesizer. It was used on several famous sound cards like the Sound Blaster Pro 2.0 and the Sound Blaster 16 ASP.

The first task in building this kit is right away the most challenging one as well. The sound chip and 4 other components are so called SMD components. SMD components are surface mounted which means they don't have leads sticking through holes in the PCB, but they rest flat on the PCB and you have to solder the pins to pads on the PCB surface. These pads are very small and very close together. I did need my glasses for this and a magnifying glass to check if I did everything right afterwards.

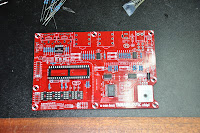
Wilba was so nice to put some flux in the kit to help improving the flow of the solder. That made things a bit easier. I did solder some pins together though. (It is almost undo-able not to make this mistake by the way) So you need some means to remove excessive solder as well. I used my de-solder pump for this. But in the end I got it right. In the picture on the left you see the remaining parts that I still have to put on there. But those are all conventional 'trough hole' components, so that should be a lot easier :)

Next to taking picture for my blog, I'm also filming most part of the construction of the SammichFM. So hopefully I can show you a nice video as well when it is done. Only during my work I'm not paying much attention to the camera of course and today already the battery ran out during filming and I didn't see that until after I had put on all the SMD components. I just watched how far it filmed and I have enough I think to show the process, even though I can't film to close but I guess you'll get the idea. OK enough for today. I'll continue this project soon and I will post updates on this blog from time to time.

05 November 2011

Rob Papen visits Synth.nl Apollo Studio Video

A while ago Rob Papen visited my Apollo studio. Together with his crew he was filming some footage for his upcoming book and DVD about sound design on synthesizers. While they were filming in my studio I filmed them with my own camera. So this short movie is sort of a 'making of'. More info about the DVD will follow on http://www.robpapen.com. I made all the 3D animations in this movie with Cinema 4D. You can watch it here:

26 October 2010

Analog SFX Processor Racks

Since I don't have any big music projects at the moment (just some small stuff) I decided it was time to do some changes to the studio that I had planned for a long time. The first thing I did was making a lot of balanced jack-jack cables because I wanted to hook up the analog SFX processors to the new Anatek SMP-16 I got a while ago from Ron. This is a digitally controlled analog audio and midi patch-bay. I like it a lot, but unfortunately they are not made any more, so they are hard to come by.

I removed the Moog Voyager RME from this rack because it wasn't in a convenient spot any way in that rack. That gave me the opportunity to put the Yamaha SD-5000 delay in there and the Sony's that I got and repaired earlier. The three Rolands are paired together and the Sony's two by two. The patch-bay has another 4 connections on the front (1 stereo input and output) that enables me to hook up another SFX processor when I want. A pedal for example or whatever. From the patch bay two stereo inputs and outputs go to an AD/DA converter in the rack next to it. So I can use two separate SFX chains in this rack. I can chain them together as well though. For example use all 4 Sony's in one chain by connecting the outputs of the first chain to the input of the second chain on the patch-bay.

In this picture you can see the rack next to it as well. This one also has an Anatek SMP-16 with the same construction. Also two stereo inputs and outputs go to the AD/DA converter. I'm not entirely done with this project yet since I ran out of stereo jacks. I ordered some more but they won't arrived until Thursday the earliest. So I decided to build everything in for now since I'm having a visitor over tomorrow. After that I'll have to remove everything again from the racks and do the rest of the wiring. It will be nice to be able to use these SFX processors next to the digital ones that I use primarily. At the moment I'm using a Behringer AD80000 as the AD/DA converter. I plan to replace it in the future by an RME ADI-8 or an Apogee converter, but for now the Behringer will do fine. They are quite OK in my opinion actually. I did play around a bit yesterday after I was done with the Sony DPS-D7 and Yamaha D-5000 delays. And I can tell you they are both very good :) I'm looking forward to using them in my productions. I have used a lot of external reverbs already, but never external delays actually. The only thing I need to get working now is getting them synchronized with the Midi Clock of my Sonar sequencer software.

18 July 2010

Apollo Studio Changes

I moved some stuff around again. To start with I sold my ARP Avatar. Since I bought the ARP 2600, I didn't see the added value of the Avatar anymore and I could make someone very happy with it. So it is gone. Then I moved the Moog Source into the newly installed smaller synth mount. There are three small synthesizers the now on top of each other. The Moog Source is actually a great machines. Sounds just a good as a Minimoog in my opinions it just has the advantage that you can store presets. It is not as hands on of course as a Minimoog with al its knobs, but they are getting more expensive by the minute. So get one if you can :) You won't regret it.

And then I also did some minor moving around in my digital corner. I removed the Yamaha VL-70m and Yamaha FB-01 from the rack below and put them on top of the desk. The rackspace that came free was filled by the Yamaha FSR-1. On top now is the Roland SH-32. These are all synthesizers I don't use a lot, but maybe that I have them more at hand I will give them a spin soon. I am still very happy with the spot I put the GAIA SH-01 in. It is a nice hands on machine that I'm using a lot at the moment. I still thing a lot of people underestimate it and don't see it's potential. I did however send my sound bank to some people and they don't seem able to load it. I don't really understand why. I guess Roland should make an editor for it to make it a bit easier to manage. I also couldn't find any way to export the patches as sysex. I think that is a shame too. And you can only store one set or backup on a USB stick. How did they think of that??

07 July 2010

Yamaha SY-2 added to the Collection

On E-bay I found this mint Yamaha SY-2 (bottom one in the picture) . It is one of the first monophonic analog synthesizers that Yamaha build. (right after the SY-1). It was produced from 1974-1978 so it is quite old. It is kind of a preset synthesizer like the Roland SH-2000 that you can see in the picture on top, but you can override a lot of the parameters. So that makes it very flexibel. And it sounds like nothing else really :) Just like on the SH-2000 it has aftertouch, but it is even better on the SY-2. It makes a nice set together with the Yamaha CS-50 doesn't it? Lots of colored knobs :) Well the SY-2 also has no midi or CV gate like the other two. That wouldn't be usable anyway since the after-touch doesn't work then. And especially that is what makes all three of these synthesizer so special. It is a welcome addition to the collection. You'll surely hear it on some future recording.

03 June 2010

Yamaha CS-30

I found a very nice machine on E-bay that was recommended to my by my friend Hans. It is a Yamaha CS-30. It is a completely different machine from the Famous CS-80/50/60 series. It is a very analog machine with lots of knobs. It especially has a lot of routing options, like an Roland SH-5 and I liked that one a lot for creating sound effects for that reason. I already have a nice place in mind for this machine. I think I can just fit it in somewhere still. Even though I'm going to have to sell some stuff soon to make room. On the other hand doesn't the flight case look fantastic? It is almost a shame to take it out :) The machines I'm still looking for to put in my collection are getting more rare and more expensive by the day though unfortunately :(

01 March 2009

New Synthesizers in the Apollo Studio

I'm still working on the new studio. Cabling still isn't done. I'm trying to pick the work up again after the holiday. But besides that I also added some new synthesizers to the new studio. Here you see a Yamaha CS-50 that I picked up today. It is the little brother of the famous CS-80 that was heavily used by Vangelis and also the slightly bigger CS-60 that was used by Jarre. But this one sounds just as nice. A bit less powerful, but the sounds I love the most are still coming out. I love it already. It tunes very nicely but lacks midi of course. I'll start looking for a aftermarket midi upgrade for this one, because I'd love to fully integrate it in my setup. The keyboard plays amazingly. I never had the pleasure to play a nicer and smoother after touch ever. You will hear this one on future recordings for sure.

Another synthesizer that I have been looking for a long time is this Yamaha VL-1. It is a virtual acoustic synthesizer which means it uses mathematical models to calculate the behavior of actual acoustic instrument. It comes with a breath controller which really makes you play a flute or saxophone like a real one. I had the very small module version of it (VL-70m), but this one has four times the power and sound much better. And of course the keys are specially fit in combination with the breath controller to get the maximum expression from it. It is a perfect lead synthesizer. I'm actually not so interested in the acoustic sounds, but you can get some very expressive nice leads from it. This one is unfortunately equipped with version 1 ROM's. Version 2 ROM's were sold as an upgrade, but I can't find them yet. They give even more and better sounds. If you can help me with the ROM's or EPROM images that would be highly appreciated.

The last new addition was an Alesis Fusion 6HD. It is a digital workstation like synthesizer with a build in hard disk. It has USB and you can upload your own samples or even Akai format sample CD's to it. It sounds very nice and I love the different look. It even has a mod- and pitch wheel that lights up blue when you turn it. But of course I bought it for the sounds. The standard presets are not so good but mine came with some sounds programmed by the previous owner and they really show it true potential. There is even a sound set in there made by Klaus Schulze especially for this synthesizer. Another nice thing is it has both SPDIF and ADAT out, so I can easily integrate it in my digital setup. You will hear some nice pads and choirs from this one in the future.

I didn't want to keep this last picture from you. Here you see the CS-50 back to back with the Roland Jupiter 8 that also found a nice place now in the new studio. The Jupiter 8 is also a joy to play one. It has so much character while remaining super soft when you want to. Especially layering through sounds and putting them through some nice effects makes you dream away instantly. I have given myself until the end of this month to finish the studio. But I can't wait to start finishing my next album in this studio. It is becoming really a dream come true. I'll update you soon on the progress. And I will ask my friend Chris soon to make some better pictures of the studio and maybe some film. I think it looks good enough by now for that.

28 November 2008

Yamaha Motif XS6

I recently sold some stuff from my current studio to make room for some new stuff. This Motif XS6 was actually on my mind for a while already. I played it several times at Live Music, one of the music stores where I usually buy my things, and liked the sound a lot but I decided two times before to wait until the new studio was finished. But last weekend I visited my friend Qui Robinez, who also designed a lot of sounds for me, and he already bought the Yamaha XS8. He showed me what this synthesizer can do and I was blown away. I thought it was just another good sounding rompler, but don't let that first impression fool you. There is actually a very complex synthesizer underneeth. Lots of modulation posibilities and the arpreggiators alone are to die for :) You don't see that though until you fire up the editor that comes along with it. Really amazing what you can do with it. I learned from my friend also that you can install two regular DDR Dimms in it to give it 1 Gbyte extra memory and after that you can do sampling as well on it and load some pretty amazing extra sound banks. This thing even has an ethernet connection where you can upload samples to it over the network. I heared it last weekend next to the Korg M3, that I already love and I must admit that this Yamaha outperforms it. So when I was at Live Music yesterday and played on it again I couldn't wait any more and took it home. I ended up playing on it all night long :)

07 November 2008

Yamaha SY99

I recently sold some stuff that wont go in the new studio, but I also acquired some new stuff. One of the synthesizers I bought I was VERY impressed about is the Yamaha SY99. It is huge to start with and has a very nice 76 note keyboard with even two modulation wheels. It has an internal sequencer that I'll probably will never use, but the sounds are so great. I can do FM like the famous DX-7mkII but it can also load samples. And you can fuse these together for really cool sounds. It also has very interesting resonant multi stage Time Variant Filters. That sounds scary right? But they do sound very analog. This machine is in my opinion the best digital synthesizer ever build by Yamaha. Even the internal sound effects are very good. I just love the reverb on it. You can set it very long and it still sounds great :) This is definately a great addition to my collection.