Showing posts with label analog. Show all posts

05 November 2011

Rob Papen visits Synth.nl Apollo Studio Video

A while ago Rob Papen visited my Apollo studio. Together with his crew he was filming some footage for his upcoming book and DVD about sound design on synthesizers. While they were filming in my studio I filmed them with my own camera. So this short movie is sort of a 'making of'. More info about the DVD will follow on http://www.robpapen.com. I made all the 3D animations in this movie with Cinema 4D. You can watch it here:

07 September 2011

Synthesizers and Effects used on Apollo

Usually when I release a new album I get the question what synthesizers I used and most of the time I don't remember, but now I think I do ;) So here is a list of the synthesizers I used to create the upcoming Apollo album and also a list of the effects that were used. OK here for the synths: ARP 2600, Elka Synthex, Moog Minimoog, Moog Memorymoog, Moog Taurus III, Moog Voyager RME, Roland Jupiter 8, Roland System 100m, Roland SH-09, Roland SH-5, Roland V-Synth XT, Roland V-Synth GT, Roland GAIA, Korg Radias, Korg M3, Access Virus TI Polar, Nord Modular G2X, Waldorf Microwave 1, Arturia Origin,Anywhere Instruments Semtex XL, Alesis Andromeda A6, Eminent 310 Unique, Novation Ultranova and a Acid Lab Miami drum machine. I also used some software synthesizers.

All songs were recorded and arranged in Cakewalk Sonar X1 Producer Edition. Recording was done using Lynx Aurora 16 AD converters and RME MADI interfaces. I used quite some effects from my UAD-2 bundle, but also these hardware effects where used. Bricasti M7, Quantec Yardstick 2402/F, Eventide Eclipse, Eventide H8000, Eventide 2016 reverb, Lexicon PCM96 surround, Lexicon PCM91, Sony DPS-V77, TC Electronic Fireworx, Korg SDD-3000, EH Electric Mistress and AKG BX-15. The mastering is being done in Steinberg Cubase 6.1 and Audiofile Wave Editor on OSX Snow Leopard by my friend Hans Landman.

I hope this answers all questions up front and if not do feel free to ask. I'd be more than happy to answer your questions.

16 August 2011

Making the last SFX on the SH5 for Apollo

Today I started making the last sound effects I need for my upcoming Apollo album. I used my beloved Roland SH-5 for these sound effects. It has a lovely noise generator and excellent filter with perfect auto-oscillation for nice effects when you turn the resonance up. And also the LFO's are very nice to use. So I like it a lot for these kind of things. The Apollo project is really getting in the last stages now. 6 of the 12 tracks are done now,  5 almost done and 1 still needs a bit of work, but so far my planning looks still OK for release on the 1st of October. I'm currently fixing little errors as well together with my friend Hans and he is already starting up the mastering process for some of the finished tracks as well. I still need to finalize the artwork as well. But there is light on the end of the tunnel :)

03 August 2011

Apollo Studio Changes

Last week I got back from holiday and I wanted to get back to my music, but I'm having serious jet lag troubles. I'm very tired and I can really focus unfortunately. I'm sure it will pass in a few days, so I started doing some little studio changes. I recently sold quite some stuff to be able to get some new synths soon. One of the things I did was sell most of the stuff from my mobile modular rack. I only kept the Semtex XL that I put in the modular desk now as you can see. And on the spot where the mobile 19" rack used to be I could now finally put my ARP 2600. So now it has a decent spot where I can play on it and it is also next to my modular desk so that I can patch it to the other synthesizers. I had this in mind for a long time already, but just didn't find the time. Well now it is there I'm quite happy with it.

I also found a new spot for the Blofeld module. I removed the front cover from the Arturia Origin and that just gave me enough room to put it on front of it. So now it is finally on my desk within reach. I'm sure this won't be the final way I set my desk up, but for now it will do. The next major update will be the addition of some new synthesizers. From the stuff I sold I'll buy a new Korg Kronos and a new Roland Jupiter 80. I have ordered them a long time ago, but I'm still waiting for them. I hope to get them soon and then I'll let you know right away of course :)

22 May 2011

Rhodes Chroma Polaris in the Studio

I'm currently selling a lot of synthesizers to make room for some new stuff and I didn't really plan to buy other stuff, but then told me he was going to sell his Rhodes (Fender) Chroma Polaris and I couldn't resist to try it out. It is a very nice analog synthesizer that was developed by the ARP engineers just after they were bought by Fender/Rhodes. It has 6 voices with two VCO's each. And it was one of the first synthesizers to have a decent and full midi implementation.

And here you can see the whole synthesizer in the picture below my V-Synth GT. It looks very nice only the membrane keys are notorious for breaking down, but this one was just serviced and all the keys work like a charm. I played a bit with it today and I must say it sounds really nice, warm and analog. I'm very happy to add this to my collection since they are quite rare and especially in this state. It is quite mint actually. I'm sure I'll use it on some future production.

18 April 2011

Korg Poly 800 Repair

As you might have noticed I'm currently selling some of my synthesizers. I had some synths where I just couldn't find a nice spot for anymore and after the Musik Messe I really want to buy the Roland Jupiter 80 and Korg Kronos. So I need even more room now and money. One of the synths I wanted to sell was the Korg Poly 800 that I hardly ever use anymore. But when I tested it some of the knobs on the front panel didn't work that well. So this morning I decided to open it up and investigate what was wrong with it.

I actually expected that some of the switches would be the problem so I started by disconnecting all the wiring from the PCB that holds the knobs and took my multimeter to test all the individual switches. But after doing that they all seemed to work. Then I started to see how the knobs are interfaced and I saw quite quickly that they were arranged in a scan matrix with some diodes on the PCB. So after that I measured all the individual diodes and they turned out OK as well.

So then I started to look on the main PCB where the scan lines were going. And I decided to go and see what happened there with the oscilloscope. So I rewired everything back and starting pressing some knobs. And to my surprise all the knobs worked again. So probably there were just some loose connections on the inter PCB wiring. That was the easiest fix ever I think :) Well at least now you know what a Poly 800 looks like on the inside.

And here it is on the outside. As you can see it is a reversed keys version. At the time I thought it was cool, but now all I can think is that it doesn't fit my other synths :) And since I have enough analog poly synths now I have no need for it any longer. And in the mean time I also have a buyer for it already so it will leave my studio soon. In the mean time I also sold my Alesis Andromeda A6, Roland RS-09 and Roland SH-09. And more is going soon, as said before to make room for nicer new machines. If you like a list of what else I'm selling just let me know, but I have to warn you up front: I don't ship anything so local pickup in The Netherlands only.

11 February 2011

DIY Drum Module Video

A new video I made from a test run with a drum module I build and my sequencers.

Last year I build a drum module based on schematics from the 'Electronic Drum Cookbook' by Thomas Henry. I build it on breadboard but never got around to test it yet. Yesterday someone was filming my studio here so I couldn't work on my main desk for a while and decided to give the module a go. I hooked it up to my sequencers in the modular setup and got to test them in the process as well. We took some shots of this as well and last night I decided to make a little video from it. The noise coming from it is not spectacular but it was just a proof of concept. I made this video in Sony Vegas and that was also a test run for me. I plan to make more video's in the future for you to enjoy. The music on this video is from a track called 'Mercury' that a made for a sampler CD last year. You can listen to the whole track on my website. Look for the SchallPlatte 12 sampler CD.

25 January 2011

Sold my Moog Voyager RME

Today I sold my Moog Voyager RME (Rack Mount Edition). I put it online for sale once before and took it back off because I got regrets. I used it a lot in the past. It is like a Moog Minimoog with presets, but couldn't find a good spot for it anymore since I'm in the new studio. This was the last place I tried it, but it was not very convenient after all. I guess I will miss it though, but when I ever buy a Voyager back it will be one with keys on it since it is easier to use that way, but that takes up even more space :) Ah well, I still have my other Moogs. Goodbye old friend!

17 January 2011

PAIA 9700 Addition (Part 5)

Last week I received the final three PAIA modules I ordered for my 9700S addition. They are the 9743 Preamplifier that you can use to hook up a microphone or guitar to a modular system, the 9748 balanced modulator and the 9744 Dual CV Source, both nice utility modules. In the picture you can see all three modules still neatly bagged. I decided to start working on them tonight after dinner. I had worked all day on my Apollo album in the studio and was planning to continue later on, but this job was nice to do in between and give my ears some rest.

Again it was not very difficult, but I did seem to be missing one 100 Ohm resistor on the first module I build. I looked everywhere but couldn't find it so I decided to get one from my own stack. Well and guess what I saw lying on the ground just when I was finished with all three of them. Of course the missing resistor. Ah well never mind. In the picture on the right you can see all three modules laying side to side. All in all it took me about an hour to build all three of them.

Then I screwed them in the cabinet. As you can see in the picture on the left it is fully populated now. The next thing I need to do is get the power supply out and solder all the power cables from the modules to the PCB of the power supply. I intentionally waited with that, because I didn't want to take it out multiple times. So actually I have no idea yet if any of the modules work yet. I'm sure some will ;) We'll see about that I'll start finishing this up another time. After this I went back to working on my album. There is still a lot of work left on it, so better not waste too much time.

10 January 2011

New Battery for the Alesis Andromeda

The last period my Andromeda Alesis acted strangely when I switched it on. It was either out of tune, or all the presets sounded very distorted. Every time it started up it also asked to set the mod wheel in the lowest position and press a button. I started to suspect that the battery could be empty. I read on the Internet that the average life span of the battery of the Andromeda is about 4 years and I already have it longer than that. So I decided it was time to open it up.
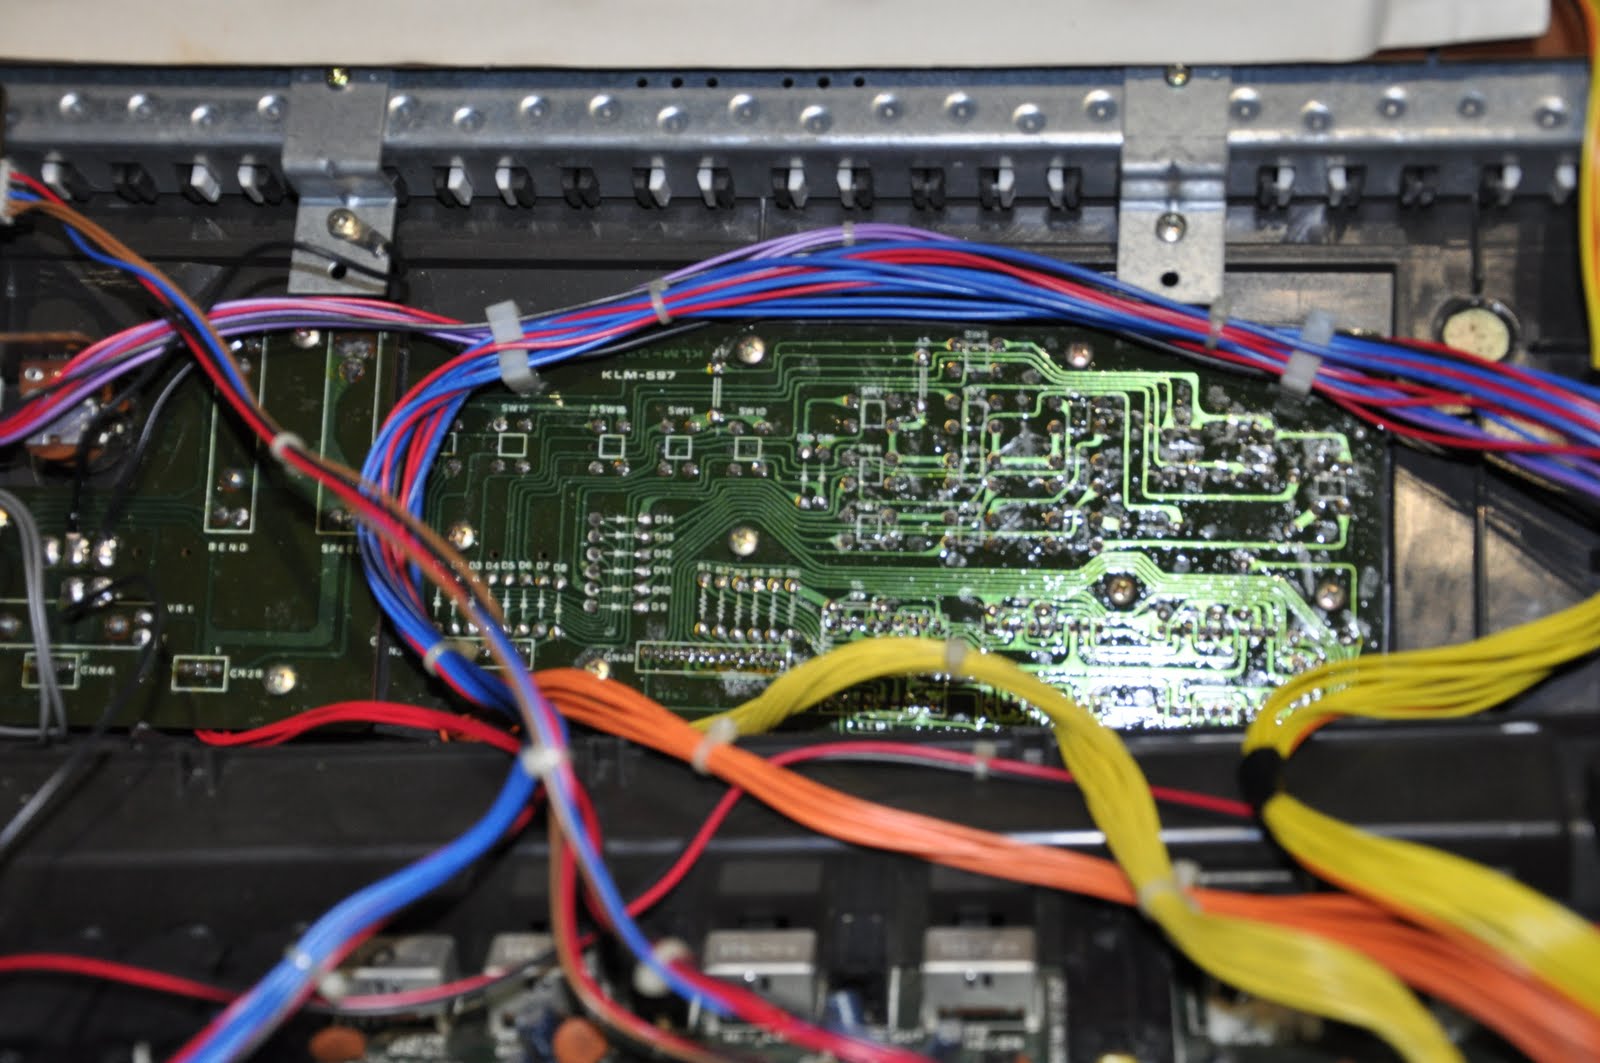
There are a lot of screws on the back and on the bottom of the synthesizer that you need to remove before you can open it up. After that you have to be careful because there are connection between the upper and lower part of the case. The first thing I did is measure the battery and it gave about 2,9 Volts not that bad, but I decided to change it anyway. the only problem is that it is soldered to the main board. So you can't easily change it. I decided to remove the main PCB to work on it.

I de-soldered the battery and  installed a new battery holder for a CR 2032 battery. In this way I can easily change it in the future. I would not recommend this job for someone that has no electronics experience by the way. Taking the synth apart, removing the board and getting everything back together is not a very easy task. The new battery measured 3.2 Volts by the way after I installed it. So maybe the old one wasn't as good anyway anymore. After this measurement I put the synthesizer together and I switched it on. It still seems to work, but it gave the same problem as before, so I did another factory reset. I hope it will stay OK now.

After that I decided to find a new place for the Alesis Andromeda, since its place was takes yesterday by the Moog Memorymoog. I took the Roland V-Synth GT and Yamaha Motif XS6 from their spot and raised the keyboard stand a bit so that another stand could fit under it. And there was the new spot for the Andromeda :) It is a bit lower than the XS6 used to be, but the result is a way nicer height for me to play on it. Another advantage is that I can also see the display better now. And even though this is a an analog synthesizer, but as you can see on the inside there is way more digital electronics in it and no discrete electronics stuff at all, so for me as of today it qualifies as a digital synthesizer ;) OK enough about this. Mission accomplished.

09 January 2011

Moog Memorymoog LAMM in the Studio!

Today I drove with my friend Hans to Dortmund Germany to pick up a new synthesizer for the studio. It is one that has been on my wish list for a very long time. The Moog Memorymoog and I found one in near mint state with even the LAMM upgrade installed in it. After we came back I put it in the spot where my Alesis Andromeda used to be and we started playing with it right away. And I can say it is a very very great machine. It is like having 6 Moog Minimoogs at once and then even better :) I can't describe how good it is actually.

And here is another pictures of it next to it's little brother the Moog Minimoog. The sound of the Memorymoog is definitely very Moog, but I think it sounds a bit harsher than the Minimoog, but having 6 voice polyphony is soooo great :) I'm sure you will hear this synthesizer on my upcoming Apollo album. No doubt about it. Next thing to do now is replace the battery of my Andromeda since it is loosing all it's settings every time I turn it on. And then probably the Andromeda is going in the spot of my Elka Synthex since it needs to go out for service. It seems like one of the voice boards lost its tuning completely. And then I'll have to find another spot for the Andromeda, but I have some time to think about that. For now I'm going to play a bit more on the Memorymoog :)

06 January 2011

More Sound Effects on the ARP 2600

Last week I created some new Sound Effects for an upcoming collaboration project I'm working on. I can't tell you details yet, but keep an eye out :) Earlier this week I used the Roland SH-5 and today I used the ARP 2600 to make some new and unique sweeps, twirls, whooshes, modulations and so on. I usually just patch around and turn knobs while recording. Then when I think I have enough I start selecting the good parts and neatly trim then down. It is very boring work actually, but in the end it is rewarding to hear them back in a track, knowing that you made everyone from scratch :)

23 December 2010

PAIA 9700 Addition (Part 4)

Recently I bough a new PAIA cabinet and bought one of their new modules to see what they were like. And I liked the stuff so I decided to go build more of their modules. Here is a stack that I got in the mail last week. I ordered the following modules: 9746 Patch Bay, 0753 Envelope Follower, 9752 Sample and Hold, 9751 Noise Source, 9741 Dual VCA and the 9745 Active mixer. They are all support modules that I can use well in my modular setup.
Here is the content of a single kit. I wrote before that building these modules is really simple. A beginner can do this for sure. You will be done very quickly. Actually I build all of the modules I ordered this morning. I didn't test them yet though ;) I still need to hook up the power to the power supply as well, but I want to do that when I completed all modules since for soldering the wires I have to remove the power supply and I only want to do that once.
And here is a picture on the modules in the cabinet. As you can see the stuff looks really nice. I like the routing schema's they put on the modules. Somehow it does make it look more expensive I guess ;) But it does help you quickly to see the difference between an input and an output and that can be a pain in the ass sometimes in a big modular setup with stuff from different vendors with different logic. As you can see I can add three more modules and that is about what they have on the site, so I'll probably order those 3 any time soon as well.

16 September 2010

PAIA 9700 Addition (Part 3)

And I also started on the first PAIA modules I bought from the new series. It is a Linear to Exponential converter with a signal inverter. Here you can see the parts that came in the kit. And actually I was a bit disappointed about it, because there is not much to build. Most components on the PCB are SMD and they are already mounted. So the only thing to do is to solder the potmeters, jacks and one potmeter and then you assemble the front panel to the PCB and put the knobs on. And then you are done.

Here is a picture on the finished module where you can clearly see the SMD components on the PCB. I can imagine why PAIA solders them on themselves, since this is not something you can easily do at home, but I don't understand why they chose this option. This clearly takes out the fun in DIY for me :) Well I don't know if all their new modules are like this. I guess I'll look into that first before I order them. On the other hand they have some nice new stuff that would complement the 9700S I already have.

And here is a picture of the other side of the PCB. As you can see not much on there. The wire on there was already in place as was one of the potmeters. I came with a note that there was an error on the PCB making this potmeter work the wrong way around. And they already installed that mod as well. Pffff actually they could have build the whole module just as easy and ship it ;) Ah well I had about and hour of fun with this project and luckily I have some more complicated stuff lying around still ;)

 And here is the cabinet with the new power supply and the module installed in the rack below the PAIA 9700S. As you can see there is plenty more room for more modules. I still need to hook up the power and test it though. So I don't even know yet if it works. But I really like the new way they incorporated the power supply in the normally unused space of the rack mount on the left side of the cabinet. I'm still planning on building a TR-808 clone and I might consider this Frac format for that one too and buy another case from PAIA. They are cheap and look nice in my opinion. I will just have to design some front panels myself then. A nice project for the near future :)

15 September 2010

PAIA 9700 Addition (Part 2)

The next task was to construct the power supply. In the picture you can see all the parts that PAIA supplies in the kit. On the top right you can see the alternative front panel that is provided with holes for the leds and power switch. On the left is the PCB. This PCB is used for all the power supply variations that PAIA supplies. So you have to see in the manual which components to install and which you don't. There is also a jumper on the PCB that you need to mount. I almost forgot it. So pay attention :)

Here you see the front panel installed in the 19 inch cabinet. There is a power led that shows if the external power is there and also two leds for the +15V and -15V outputs from the power supply. I think PAIA came up with a very neat solution for it in this way. It doesn't take up any extra space in the cabinet and you can still mount 10 Frac units in the case. It is a bit fiddling around though to get the leds on the right length on the PCB so that they just stick out of the holes of the front panel.

 And here you can see the finished PCB on the inside of  the cabinet. Also a bit of fiddling to get it in. The holes are already in the side of the cabinet to mount it by the way. Just make sure you have the side panels with the holes to the front. I still need to hook up the power from the external adapter, but wanted to make sure it fits. The only thing that is a bit odd is that when you need to hook up an module, you need to take the PSU out again to solder the wires for the power of the module on the PCB. On the other side (on the module itself) PAIA uses a connector. I think they should have done the same on the power supply itself. That would have made it a bit more flexible. Ah well. It will work in the end I guess.

14 September 2010

PAIA 9700 Addition (Part 1)

It has been a while since I did anything on the DIY side, but since I'm almost done with the Refuge en Verre album I'm starting things up a bit again. The first DIY stuff I ever build was a PAIA Fatman and after that a PAIA 9700S. Recently I read somewhere that they had some new modules out so I visited their website and saw that they actually have quite nice new stuff out. I decided to order a new cabinet and one module to start with. The stuff arrived last week. Here it is in the picture on the left.

 I started with constructing the cabinet. These PAIA cabinets come quite cheap actually and are quite OK in quality in my opinion. I think it is not Eurorack but Frac format. The whole thing is made of aluminum and you have to bolt it together. Quite easy to do actually. The only thing you have to do first is remove the plastic foil that covers every part for protection. And of course I forgot ;) So I had it all bolted together and then could take it apart again to remove this foil.

 The sides are connected with bars to each other and then you can screw on the bottom, back and top cover. When I wanted to do this I found out that I made another mistake. So I could redo the whole thing again. Next time maybe I should read the manual after all even if it looks simple ;) A well you get it done quicker every time ;) OK so here is a picture on the cabinet all finished. Looks quite nice I think.

And here is one more picture of the finished cabinet in the rack right of my modular desk. Here you can also see it together with the first PAIA 9700S I build a long time ago. Next thing up is constructing the dual power supply. It has +15V and -15V you have to order that separately by the way and pay good attention since PAIA has several power supply options. More to follow soon on this project that has room now for 10 single modules :)

08 September 2010

Fixed the Elka Synthex Today

The last time we worked on the Surround Speaker setup I had to move the Elka Synthex to make room. Since that move it was completely out of tune. Today I had to remove it again and I decided to open it up. To start with the plastic part right of the keyboard was broken and I glued that back it. Further more I checked and redid all the connections going from the PCB's. And when I put it back in place and tested it everything worked fine again :) I'm very happy about that. It is a great synth and I was not happy to have it leave my studio for repairs. Well another problem solved today :)

09 August 2010

Korg Mono/Poly added to the Collection

Last week I added another very nice synthesizer to my collection. It is a Korg Mono/Poly. It is a small but remarkable analog synthesizer. It has four oscillators that you can use to play polyphonic, but it also has a great and very powerful unison mode to use it monophonic. But when you use the appropriator you can also rotate trough the oscillators. When you set them all to a different wave form you get a very nice alternating sequence. Last night I put it next to me in the studio and jammed a bit on it. I had great fun. I think actually there is nothing like it. I like it so much that I plan to write a little review about it in the near future. I'll post that on my blog when I have time.

11 July 2010

Modular Progress Overview 4

I haven't build much recently, but I am testing all the modules that I have connected to the power now. Here I was testing the syncing of the clock of all sequencers. They all run very smoothly :) I also made some sound effects already on this modular setup. It is really great to patch on it. Since I'm working on a lot of new releases for later this year I don't think I'll have much time to work on the modular this year anymore. So for now the project is on hold. I expect that I will be working on it again from January on. So keep an eye on the blog for the progress :)

07 July 2010

Yamaha SY-2 added to the Collection

On E-bay I found this mint Yamaha SY-2 (bottom one in the picture) . It is one of the first monophonic analog synthesizers that Yamaha build. (right after the SY-1). It was produced from 1974-1978 so it is quite old. It is kind of a preset synthesizer like the Roland SH-2000 that you can see in the picture on top, but you can override a lot of the parameters. So that makes it very flexibel. And it sounds like nothing else really :) Just like on the SH-2000 it has aftertouch, but it is even better on the SY-2. It makes a nice set together with the Yamaha CS-50 doesn't it? Lots of colored knobs :) Well the SY-2 also has no midi or CV gate like the other two. That wouldn't be usable anyway since the after-touch doesn't work then. And especially that is what makes all three of these synthesizer so special. It is a welcome addition to the collection. You'll surely hear it on some future recording.