Showing posts with label equipment. Show all posts

22 June 2014

New Studio PC

I told you I'm currently rebuilding my studio. The first thing that really needed an update was my studio PC. I ran on a quad core2duo with 4 Gbyte of RAM and Windows Vista 32 bits for a long time, but it started to crash on me. I wanted to upgrade to Windows 8.1 anyway and get more inputs in the machine. I had two RME PCI MADI cards in there and a UAD2 quad card. So time for an upgrade :)

Here is a picture of some of the parts that went in there. I decided to use the same ASRock X79 extreme6 motherboard that I use in my render servers for the render farm and also the same Hexacore I7 processor. I put in 32 Gbyte of RAM and a OCZ Vertex 4 SSD to boot the OS from and run my applications. I got a new UAD-2 Octo card and the quad will move to my mastering PC that still had an UAD-1. This one is no longer supported and doesn't run moders plugins anymore. And finally a RME PCIe MADI fx card with 3 MADI inputs and outputs giving me 192 channels of digital audio in and out!

Here is the finished result. After this I started installing. Unfortunately it didn't work out as easy as I had hoped. The Windows 8.1 installation went like a breeze. Also the RME card drivers installed easily, but when I wanted to install the UAD-2 card every time Windows crashed with a Blue Screen of Death (BSOD). Not nice. First I replaced the power supply since the old one was only 430 Watt. The new one is 700 Watt, but this did help unfortunately. Then I moved the UAD-2 to another PCIe slot and that did the trick. Then it installed and also worked! After this I had trouble again with the RME card. I used the WDM and had digital artifacts on my audio signal. I switched to ASIO and then everything was fine. I don't really understand why, but to be honest I don't care :) ASIO works fine and I was using that on my old PC too. Now I have to install all my software and see if I can open my old projects that I'm still working on. But the first step is made in the studio upgrade.

02 June 2014

Kurzweil KSP8 Battery Replacement

After I replaced the battery yesterday in the Sony DSP V77 I realized I had some more equipment that actually did complain about battery replacement. One of them is this Kurzweil KSP-8 also a very nice effects machine famous for its LaserVerb preset. This thing is actually a surround machine but you can also use it as 4 x stereo :) Quite powerful. It was still working fine, but I though let's replace this one BEFORE problems arise. So I opened it up.

Then I stared at the PCBs for a while and was getting crazy because I couldn't find any battery. I did look up what kind of battery it was and it was the same CR2032 that I had in stock so it should be spottable. Well I'm not sure if you are familiar with the abbreviation RTFM, but this was a clear case ;) There is a hatch on the bottom site of the machine where you can easily reach the battery without taking the whole machine apart. Duhhhhh :) Ah well good news is it stopped complaining now and I hope it will for a while. Again I hope this tip will help someone else :) Back to relocating and rewiring equipment.

01 June 2014

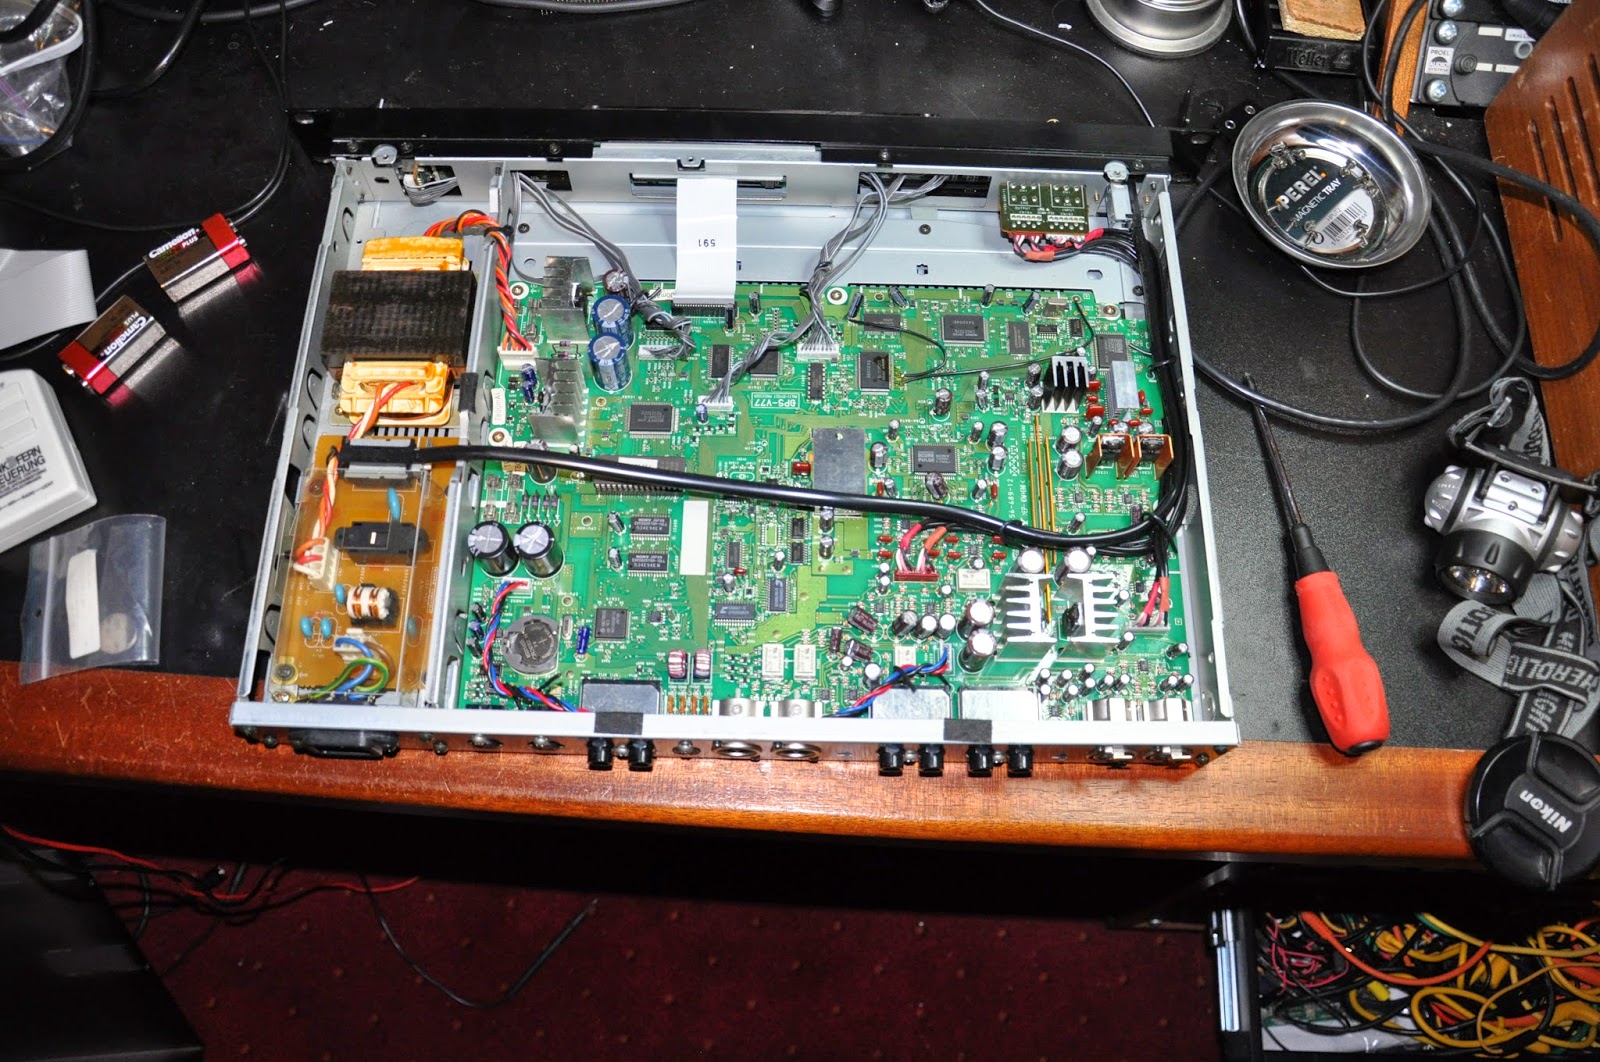
Sony DPS V77 Battery Replacement

The last time I wanted to use my Sony DPS V77 it didn't work any more. I though it was broken and that made my quite sad since it is a very nice vintage digital effects processor. I was already looking for a new on on E-bay and saw that prices have risen on these machines. So I thought maybe I can repair it. Then I switched it on and off a couple of times and noticed that sometimes it actually did start up, but the display was looking funny. So first I thought it was some kind of memory problem.

Today I had to take it out of the rack anyway, since I started renovating the studio today, so I downloaded the service manual and thought I could maybe find the problem. And one of the options it gave is look at the battery Voltage. So that was the first thing I did and guess what? It was way too low. So if you have one of these and it is acting funny. Check that first! It doesn't give you any warning or anything.

Replacing is it quite simple. The battery is a standard CR2032 and I even had a couple in stock. It is fitted in a nice fixture so you don't even have to do any soldering. After replacing it I measured again and now it was fine. I powered the machine up and directly it gave a correct init procedure again. I changed the preset, switched it off and on again and it came back with the same preset. Problem solved :)

If you ever come across one of these machines on E-bay or whatever do give it a serious consideration. They sound really good for the money. Lots of producers use them as a secret weapon. If you want to hook it up digitally you do need a special break out cable, but you can still buy those on E-bay too once in a while. OK now I'm going to put it back in it's new spot. I'll show you where soon.

Lexicon 480L Reverb

One of my all time favorite reverbs is the Lexicon 480L. I have looked for one in a good shape including the LARC remote controller for a long time and finally I found one on E-bay from the Netherlands. I didn't like it to be shipped so I picked it up personally. I need to find a nice spot for it now. I'm currently working on a small studio rebuild that I will tell you all about on this blog. There is one more reverb I'm looking for and that is the even more classic Lexicon 224. They are even harder to find though. As you can see it even came with 2 expansion cards and a digital break out box. I'm going to find out now how the digital interface works, since that would suit my setup better than the analog I/O interfacing.

22 December 2013

New Mutec Word Clock Generator

 I have a lot of digital out board gear that needs to synchronize. For this I use Word Clock. So far I used an Apogee Big Ben to generate and distribute the clock signal, but it has only 6 outputs. This means you have to make a lot of loops and terminate them. Recently I had some trouble with my clocking and it looked like a loose terminator or connector, but go find that :( I could solve it by fiddling around at the cables, but this was only a temporary solution. So I decided this was one of the first things on my list to solve with the studio rebuild.

At first I looked for an extra distributor to replicate the Big Ben's signal, but eventually I chose to replace it by this Mutec iD + iD dp. I already had some equipment from them and it is really good stuff. This clock generator has 16 Outputs! This meant that I could seriously avoid looping the signal though several chains, but that I could attach more equipment directly to this clock generator. Today I decided to remove all BNC wires from the Big Ben and put this one in. As you can see in the picture it is in the same spot now.

And here is what I was left with after the operation. I replaced all cables by version that were as short as possible and removed as much T-connectors and terminators as possible, since they are usually the source of all clocking connection troubles. Where possible I used the internal 75 ohm termination of the equipment itself. Most digital equipment has a switch to select whether you want termination or not.

And here is the good old Big Ben on it way to someone else. I already sold it. It is a good machine and it has helped me trough several album recordings, but for me 6 outputs is not enough. They really should consider making a version with more outputs.

After I hooked everything up again and checked if all equipment was synched to Word Clock again, I did some testing and was curious if I could hear any difference. It might be my mind playing with me, but I had the idea the sound was a bit brighter than before. But the problem is with these kind of things that you can't really be objective. But the most important thing is everything works again and is clocking like new :) More updates soon. For today it was enough of a job :) You can find more information on Mutec here: http://www.mutec-net.com

27 November 2013

New Synths in the Studio

After a very long time of buying completely nothing, suddenly I saw a synthesizer that has been on my wish list for the collection from day one. Never before I found one for sale in a condition like this one. It is an EMS 'Putney' VCS3. It is quite a rare synthesizer that was made in 1969. That is also the year that I was born, so that makes it extra special for me. It is a modular synthesizer that became famous famous because of its unique joystick, envelope fire button and the patch matrix. The matrix works with little pins and is actually quite convenient compared to plugging in patch cables to modules.


The machine is really in a great state, everything works and I'm so proud :) There is actually one in the London science museum you know :) That was the last time I saw one. The EMS's are actually perfect for creating sound effects and that is what Jean-Michel Jarre has used it for a lot. He made EMS famous together with Pink Floyd I guess who made there famous 'on the run' sequence on it. Well on the right is a nice pictures of the other machine I love for sound effects the ARP 2600.

And here is another syntesizer that I added to the collection. It is a Sequential Circuits Pro One. It is of the same make as the famous Prophet 5. This one is monophonic though. It is supposed to be great for bass sounds. To be honest I never played on one before, so this is new territory for me as well. A very nice feature is that it also has a sequencer on board. I can't wait to play around with it, but first I have to have a go at the VCS3 :)

26 March 2012

Eventide H8000 Back from USA

My H8000 was broken a while ago and I have tried to repair it myself, but didn't really succeed. Eventually I decided to sent it to Eventide in the USA to let them have a look and they found that the socket for the main processor was loose. This seems to be a common problem, so they desoldered the socket from the PCB and soldered the SMD mounted main processor directly on the PCB. Besides that they also repaired the big dial knob on the front panel. Last week I got it back and I started playing around with it. Man what a machine this is. I wouldn't want to miss it again. I bought an Eventide H4000DSP in the mean to fill in the gap. It has a couple of the same presets. Now that the H8000 is back I'm going to sell the H4000DSP again.

05 December 2011

TC 4000 Reverb and RME ADI-8

Recently I added two new devices to my studio. My friend Hans found a very cheap deal on two TC 4000 Reverbs, so we both bought one. I didn't use it until now, but I can tell you it is very good. I missed the VSS3 and NonLin2 algorithms since I sold my PowerCore X8, but they are back :) And more! This reverb really sounds top notch. I also bought a very cheap RME ADI-8 AD/DA converter that was traded in at one of the music shops I come a lot called Live Music in The Netherlands. Both of them are now in the spot where my Eventide H8000 was before. This one is now on it's way to the USA for repair. When it gets back I'll have to find another spot for these two, but they are here to stay for sure :)

29 March 2011

Eventide 2016

I recently sold some stuff from the studio to buy an effects processor that I recently heard and fell in love with instantly. It is an Eventide Reverb 2016. It is the reincarnation of the famous and very rare SP2016. You can see it in the picture just above the Eventide 4000DSP in the bottom. Today I hooked it up and gave it a spin. And it lived up to the expectations :) What a sound! If you are curious what it sounds like go to this URL: http://www.retrosynth.com/~analoguediehard/studio/effects/eventide_2016/ and listen to the demo's. I was sold when I heard them. I especially love the preset #5 called  'Deep Reverb'. It is so alive. Can't wait to use it in a track, but I don't think I'm going to use it any more on Apollo since I'm too far with the tracks already. And yes I'm still working on the album. I'll post an update soon.

25 January 2011

Apollo Studio Power Failure

This morning I had a very strange power failure in the studio. I have a large UPS to provide the whole studio with power. It also regulates the power from 240 Volts back to 220 Volts. Recently I accidentally must have put the UPS in bypass mode when I was looking at the power consumption. Because this morning a fuse in front of the UPS blew and the UPS switched off immediately, no alarm nothing :( Or maybe it was empty already and I didn't hear the alarm and it went in bypass mode I don't really know actually :) Also a possibility.

When I put it back on though it was also on 200 Volts in stead of 220. I tried to put it back in 220 Volts, but it didn't work. Only after reading the manual I found out that it had to be on battery power before you can change this setting. Luckily I had a visitor of to buy my Moog Voyager RME and just before that I saved all my files. Also the storage units in the rack in my server room luckily are on a different UPS, so I didn't lose any data. After restoring everything I did some tests on the UPS and everything seemed fine, but it is still strange that this happened. Ah well it only cost me some time. When the battery is full I'll switch of the fuse again and see what happens. But this time I'll do that with less equipment on :)

The reason I run the studio on 220 Volts in stead of 240 Volts is that I have lots of old synthesizers. Some are even build in 1971. In those days the power wasn't as high as today and the power supplies in those machines are not designed to regulate that much power down. It is only a few percent, but it will shorten the life of the power supplies for sure. Well bad luck today, but the UPS has saved me a couple of times as well before.

19 January 2011

Bricasti V2 Upgrade

Recently Bricasti released version 2 software for the M7 reverb processor. I already got beta Rom's at the Musik Messe last year, but now they had a final version. So I asked to get them, but they didn't want to ship the loose roms. I had to make an appointment with the distributor in The Netherlands to get the upgrade in. And so I did. Today I visited Iemke Roos in Amsterdam with my Bricasti and after a cup of coffee I could leave again with an upgraded reverb. Now I'm going to have to test the new algorithms. There should be some nice new lush stuff in there.

15 January 2011

Behringer V-Verb Repair

Recently my Behringer V-Verb (REV-2496) broke down. It was my first digital reverb and it actually is quite a nice machine. There is one preset in there called 'Gold Plate' that sounds really good in my opinion. I have used it a lot in the past, but lately it didn't want to switch on anymore. All the lights went on and after 10 minutes or so sometimes it suddenly started working. But then I had some bad spikes on my digital audio path the last days and found out that it was the Behringer causing this so I took it out the rack.

I informed about the possibility to repair it, but then I was told I'd better throw it away and buy a used one back. Well I was not intending to do this, because first of all I hate throwing stuff away and besides that I was not planning on spending money on a new one. So I decided to open it up. I suspected a problem with the power supply since it did work when it was on longer. The spikes suspected me that maybe some capacitors were broken and guess what? I spotted right away that at least 4 capacitors were expanded and there was on two even a substance on it. If you click the picture you can see it up close yourself.

So this morning I went to me local electronics shop and bought some new capacitors. Then I took the power supply out and de-soldered the old capacitors. The new ones were not the exact same size, but luckily they did fit. For the new capacitor I took a bit higher voltage types by the way because I hope they will last longer then. In the picture on the left you can see the power supply with on the left the old capacitor and on the right the new ones. All in all not more than an hour work by the way including taking it apart and reassembling everything.

Then the exciting moment came to try it out. First I applied power to the power supply while it was still disconnected from the other electronics. Well no bang and no smoke came. So far so good ;) Then I connected the power supply back to the rest and switched it on. And happy days :) It worked. It switched on right away. I still have to get it back in the rack and see if those audio spikes are gone, but I have very good hope for that. So another successful repair project :)

30 December 2010

VS-700 Upgrade

Recently I upgraded to Sonar X1 and that also included new software for the VS-700 console. But I got all kinds of messages that my firmware was outdated. So I looked for new firmware on the Cakewalk website and also found. But I also found out that it is not so easy to upgrade because you have to flip some dipswitches back and forth and for that I had to take the VS-700 module out of the rack and I postponed it everytime, but today I finally decided to finally do this.

The first thing to do is open up the ARX slot compartment and flip a dipswitch there to put it in upgrade mode. Then you can load new firmware over USB in it, after that you have to do the same for the rack processor itself. I think it would have been nice if Roland had put these dipswitches on the back of the unit so you don't have to take it out of the rack. Well after this the VS-700C itself (the controller) has to be upgraded as well. But for this you have to install it stand-alone (without the processor) with special drivers. Again some dipswitches on that back and new firmware. Well it took some time but luckily it all worked out.

But after this I decided to move the VS-700 Processor to another place in my main desk. Now I can open it up while it stays in this position in case I have to upgrade it again in the future. Only today I found out by the way that I could choose to hookup the console without the processor. I don't actually use the audio interface that is in there and to be honest I never used the build-in Phantom VS synthesizer either. So now I decided that I'm going to at least use the Phantom VS. I already hooked it up to the MX-1000 mixer that in the mean  time replaced the Friend-Chip DMX-12 digital patch bay. I'll try them both out tomorrow. For today I'm done :)

29 December 2010

Still Moving Stuff Around

I wrote before that I'm moving stuff around in the studio at the moment. I'm doing some changes at the main desk especially on the digital audio part. The reason is that I found some nice reverbs that I want to add later on and I need to make room for them. The first thing I did was move the Apogee Big Ben. Here you can see it on its new position. In the bottom is a digital Roland mixer that can mix 4 SPDIF signals into 1. It will replace the Friend-Chip DMX-12 above it that I use to switch between those 4 signals now. So I don't need to switch anymore later on. I can play all for  of those digital synthesizers now on 1 input. I'll probably sell the DMX-12 Digital Patchbay after that.

The next thing I had to do is create two more AES/SBU connections. I will do that by connecting the Eventide H8000 (that is still broken) over AES/SBU in stead of ADAT. I'm only using 4 channels on it anyway (dual stereo setup) and the other 4 channels I can use then for the new reverbs. To translate the ADAT I had now into 4 AES/SBU connections and back I'm using a RME ADI8-DD digital format converter. It is the bottom RME device in the picture. I got this one quite cheap on E-bay and it is already connected and works like a charm :)

And this is the first new Reverb that I'll hook up soon. It is an Eventide DSP4000 that will start as a replacement of the H8000 when I ship it for repair. I will hook it up soon, I hope it can match the sound of the H8000 a bit, since I'm sure I'll miss the H8000 when it is gone. Also this unit I found very cheap on E-bay by chance. Must be my lucky week ;) Hopefully tomorrow I can give it a spin. I'll keep you updated on the rest of the reverb stuff. Seems that I'm even more addicted to reverbs at the moment than synthesizers :D

06 December 2010

RME HDSP MADI broken again :(


And again it looks like one of my RME HDSP MADI cards is broken :( This is already the third time. I really like the way these cards work when they do but this is the third time I have one going out of order. The last time by the way I credited RME for their support and lending me a spare card. Unfortunately they screwed up really bad after that. They wanted to have the load card back when I was in the middle of the production of a new album, so I said 'not now'. But they wanted it back. Then I asked if I could buy the card from them for spare. At first they didn't want to do that at all and then finally they decided to sell it but for the FULL price of a new card. Being under pressure I agreed. Then I asked if I have 2 years warranty like normally and at first they didn't want to give warranty at ALL!! Of course I didn't agree to this and finally it looked like it was settled. Well UNTIL this card broke down as well. They didn't want to repair it at all and they let me supplier Live Music buy a new card for me eventually. REALLY BIG FAIL if you ask me. And it took a whole YEAR of E-mails back and forth to get my card. Live Music will probably never sell any RME product ever and I can understand that very well. Well I still have this card now as spare so I'll try to replace the broken card next week, because I'm working on another project with a deadline right now. But if you are considering to buy something from RME I would really think TWICE!!

07 November 2010

Studio Desktop Changes

While I was working on finished the last album I was annoyed about some ergonomics in my studio, so I decided to start changing some stuff. The first thing I did was buying a new keyboard. I'm working a lot in the dark and even though I can type blind, you have to start on the right key ;) This new Logitec keyboard is illuminated, so the letters on the keys light up in the dark. And it is a much higher quality keyboard than the two I had previously on my desk. I use a tool called Input Director now to use this single keyboard and mouse on 3 separate computers. Basically this tool makes it feel like they are one computers with 6 screens attached to it :) I also got a new wireless trackball after that in stead of a mouse. That saved a lot of space on the desktop to start with.

Then I moved a lot of stuff around on the desk to see what was most convenient. I ended up moving the Jazzmutant Dexter to the right of my keyboard. It used to be on the left, but since it is possible to control both my Audio and Video PC with it, it was more logical to put it on that side. I had to move the Symbolic Sounds Paca away from the desk to make room for the remote of the Kurzweil KSP8. That had to go more to the back. And the Paca is now right in front of my on the upper layer of my main desk, just under the screens. A much better place actually than it was in before. Maybe I'm going to use it more often now. Who knows. I haven't done much with it yet to be honest. I had to move the Arturia Origin a little bit to the right as well. It is a bit out of line now with the rack mounts behind it, but who cares? ;)

And then suddenly I had space left on the left of my keyboard. I decided to hook up my old Kore 1 controller again. I'm using some Kore 2 SFX plugins lately and Kore 2 still supports this old controller as well. It is nice to have more hand on control over the parameters. And when I was thinking about how nice knobs are I though well maybe in the space that is left I should find another midi controller of some sort. And I decided to go for a Novation Zero SL MK2. I initially looked for the Old MK1 because it has two displays, but several people told me that I'd better go for the MK2 because of drivers support with Windows 7 64 bits etc. Also the new Automap software will be developed for the MK2. I'm not even sure if I'm going to use the Automap feature since Sonar has its own ACT for this purpose, so probably it will stick in Midi mode.

And here is a little overview picture. I already did some work today again in the studio. And I must say it it quite an improvement :) Just a bit more ergonomic and also some extra knobs to tweak around with. It looks like a very small change, but actually this took me two days ;) Of course this was the fifth variation I tried and every thing is attached to cables as well that I had to redo from the back. And that means crawling behind the desk etc. Ah well I'm not complaining actually I like doing stuff like that. I still have some more stuff on my todo list for the coming week. So probably I'll post another update in the near future about the rest of the work I did. Oh and it all looks better in the dark of course so I'll try to post some pictures later on as well how it looks with the lights off. Well enough for today.

26 October 2010

Analog SFX Processor Racks

Since I don't have any big music projects at the moment (just some small stuff) I decided it was time to do some changes to the studio that I had planned for a long time. The first thing I did was making a lot of balanced jack-jack cables because I wanted to hook up the analog SFX processors to the new Anatek SMP-16 I got a while ago from Ron. This is a digitally controlled analog audio and midi patch-bay. I like it a lot, but unfortunately they are not made any more, so they are hard to come by.

I removed the Moog Voyager RME from this rack because it wasn't in a convenient spot any way in that rack. That gave me the opportunity to put the Yamaha SD-5000 delay in there and the Sony's that I got and repaired earlier. The three Rolands are paired together and the Sony's two by two. The patch-bay has another 4 connections on the front (1 stereo input and output) that enables me to hook up another SFX processor when I want. A pedal for example or whatever. From the patch bay two stereo inputs and outputs go to an AD/DA converter in the rack next to it. So I can use two separate SFX chains in this rack. I can chain them together as well though. For example use all 4 Sony's in one chain by connecting the outputs of the first chain to the input of the second chain on the patch-bay.

In this picture you can see the rack next to it as well. This one also has an Anatek SMP-16 with the same construction. Also two stereo inputs and outputs go to the AD/DA converter. I'm not entirely done with this project yet since I ran out of stereo jacks. I ordered some more but they won't arrived until Thursday the earliest. So I decided to build everything in for now since I'm having a visitor over tomorrow. After that I'll have to remove everything again from the racks and do the rest of the wiring. It will be nice to be able to use these SFX processors next to the digital ones that I use primarily. At the moment I'm using a Behringer AD80000 as the AD/DA converter. I plan to replace it in the future by an RME ADI-8 or an Apogee converter, but for now the Behringer will do fine. They are quite OK in my opinion actually. I did play around a bit yesterday after I was done with the Sony DPS-D7 and Yamaha D-5000 delays. And I can tell you they are both very good :) I'm looking forward to using them in my productions. I have used a lot of external reverbs already, but never external delays actually. The only thing I need to get working now is getting them synchronized with the Midi Clock of my Sonar sequencer software.

24 September 2010

Serious Metal Job on Sony DPS Series

Recently I bought this very nice set of Sony DPS Effect Processors. I found them all in one batch. The Sony DPS-D7 is a very nice delay, the DPS-R7 a very good reverb, the DPS-M7 is a modulator and the DPS-F7 is a Filter unit that also does EQ, compression and limiting. If you see them in this picture they look quite OK, but they didn't arrive in this state unfortunately. I think the courier that transported them ran over them with a truck or dropped them from a flat or something.

Well this was the state they arrived in. You can probably imagine how I felt when I took them out of the box. The stuff was packed in bubble plastic, so normally you would suspect it should withstand some handling. But this must have been hit with a tremendous amount of force by a blunt object. The front panels are made of aluminum so I can imagine that they bend easily, but behind the rack ears is some steel reinforcement. And they were bent as well. The first thing I did is take them off. I had to apply a lot of force to bend them to 90 degrees again.

After that I completely took them apart so that I could remove the front panels. Then with a soft hammer I worked on the aluminum to bend it straight again. That worked out quite OK. The only thing you see now it that the paint is gone is some places. But in this pictures up close with flash it looks way worse that you would normally see. But I'm going to try to use some black paint to fill up the spots. But after reassembling and checking everything on the inside was in one piece I focused first on another thing. Testing! I was very curious if everything still worked. And you won't believe it no problems at all :) Sony build these things like a tank I guess. After this I contacted the E-bay seller and showed him the pictures. He was not happy, well neither am I. He is trying to get the damage paid by the courier. We'll see what happens. Thanks mr. Courier. Oh Parcel Force is the name ;) Don't use them!

09 September 2010

Ursa Major Stargate 626

You know by now I guess that I have a soft spot for synthesizers, but I also developed the same for reverbs. It is amazing how a reverb can add dimension/depth/ambiance to a sound. Some are very natural and other are very weird. Recently I traded some stuff for this Ursa Major Stargate 626. This is an old but very special reverb with quite a unique character. There is not much information on the Internet and I even had trouble finding a picture for my website. So I thought let me take a picture myself and upload it. I haven't actually tried it out yet since I'm very busy at the moment with finishing music for the Refuge en Verre project with Ron Boots. But when that is done I'm going to find a nice spot for this reverb.

08 September 2010

Surround Speakers are Back

Maybe you have read a while ago that I put up a surround monitoring set of speakers using my old Behringer Thruths. I had special speaker stands made to attach them to the wall. But then it turned out they were not correctly fastened. And one of them actually came down from the wall. Luckily not causing any serious damage to any equipment, but then we took them all down again immediately to prevent further damage. This morning we mounted everything back in place.

 In the picture on top you see my center speaker. I had to mount it way higher than the stereo set I normally use, but the sound will come from behind the electric projector screen you see there on top and of course I couldn't mount it behind the LCD screens. In the picture on the right is one of the surround back speakers. The speaker stands are reinforced now and we used another type of bolts for in the wall. The guy that constructed it had a lot more confidence now. Well time will tell I guess :)

And here is one final overview picture where you can see the surround front left and right speakers as well just above the screens on the far right and left. I still need to cable everything now. I already cabled the surround decoder and the SPL surround controller. But now I need to solder connectors on the cables that come out of the ceiling. Those cables were already installed during the construction of the studio, but so far I didn't need them. It will be not the easiest task to get connectors on there since the cables are up high. No comfortable position to work in. We'll see if I can manage :)