With the electronics all done it is time to assemble the case. It is made up of several pieces of plastic that are hold together by bolts and nuts. It is kind of a sandwich construction with a bottom panel and top panel and the side panels will be squeezed between those eventually. In the picture on the left you can see the bottom panel of the whole construction. I only think I will add some rubber things under the case since now the screws are sticking out.
Then on top of this the base PCB is mounted. And on top of that go the spacers that will support the front panel PCB. On the left of the base PCB you can see the connectors that will eventually connect the base PCB and the front panel PCB. It provides power to the front panel PCB, but also the IO of the display, knobs, leds and rotary encoder. So it is kind of a bus system. Very clever I think. No need for extra wiring at all.
And on the left is a picture of the whole sandwich. Again some spacer go on top of the PCB that will eventually support the front panel it itself. I think this is quite an ingenious construction actually that Wilba came up with. It allows for easy access of the PCB's and it keeps everything easy and tidy. I'm not too good with mechanical stuff and case building, but even I can do this :) The rest of the case construction will follow later.
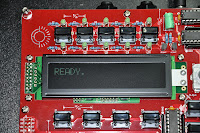
So when that done it was time to put the power on it and see if it actually was doing anything :) After switching it on you can see in the picture on the right that it worked. It shows 'Ready' in the display. Telling that the MIOS operating system is running on the PIC. It is kind of like the BIOS of a PC, but not the Operating System yet. Through this MIOS system you can upload software in the Midibox based synthesizer and that software determines its functionality. So that will be the next step in the next post. So far so good :) Still no smoke ;)


No comments:
Post a Comment